

What spark me to do Bujo?
One of my friends in Instagram has been posting her pages in her journal. And for the longest time last year, I only see only one hashtag which is #bujo. I dismissed it before. Uninterested to know what it means. But I do love reading the pages she shares in her Instagram every week. She put doodles in it and her handwriting is clear and divine. So just after the new year, I decided to finally explore the contents in hashtag bujo.
Blog content:
A. Introduction: About Bujo
B. Buying Bujo Supplies
C. Inside Bujo Set-up
What is BUJO?
Exploring that hashtag opened a whole and exciting world for me. Bujo is short for Bullet Journaling. At first I thought that the reason it was called Bullet Journaling was it mostly utilizes “Bullet listing”. Most bujo that I’ve seen uses these technique in writing daily happenings in this form rather than spontaneous long paragraphs. So I thought it came from that concept.
But digging more in the interwebs, I learned that Bullet Journal was coined and invented by Ryder Carroll. And it is actually a method to improve productivity and achieving goals. I was surprised that there are actually definite terms to know and sections in applying Bujo system. I will not discuss those since I did not apply most of them yet. But if you are interested to study the whole Bujo system. I think this site tackles it in simplest way. I will apply this on March.
For most people, Bujo is a customized planner and diary. I just love the way it also serves as creative expression. Unlike planners you can buy anywhere, bujo gives you freedom. It can be as minimal as you want or as colorful as you want it to be, or both.
Here’s how I start my January Bujo:
First, I went to Greenbelt and Glorietta to buy the essentials.
I. BUYING BUJO SUPPLIES
- Hunting the notebook: Most notebook popular for bullet journalist is the dotted notebook. It has pages with small and equally spaced dots which helps in making straight lines and spacing when writing. And it’s not noticeable unlike the usual lined notebooks. My choice,however, was blank pages. I also wanted the cover to have vintage feel but gives me freedom to design it. So when I saw this notebook in MUJI, I knew I found what I am looking for.
Here is my notebook. I put a minimalistic design on it.
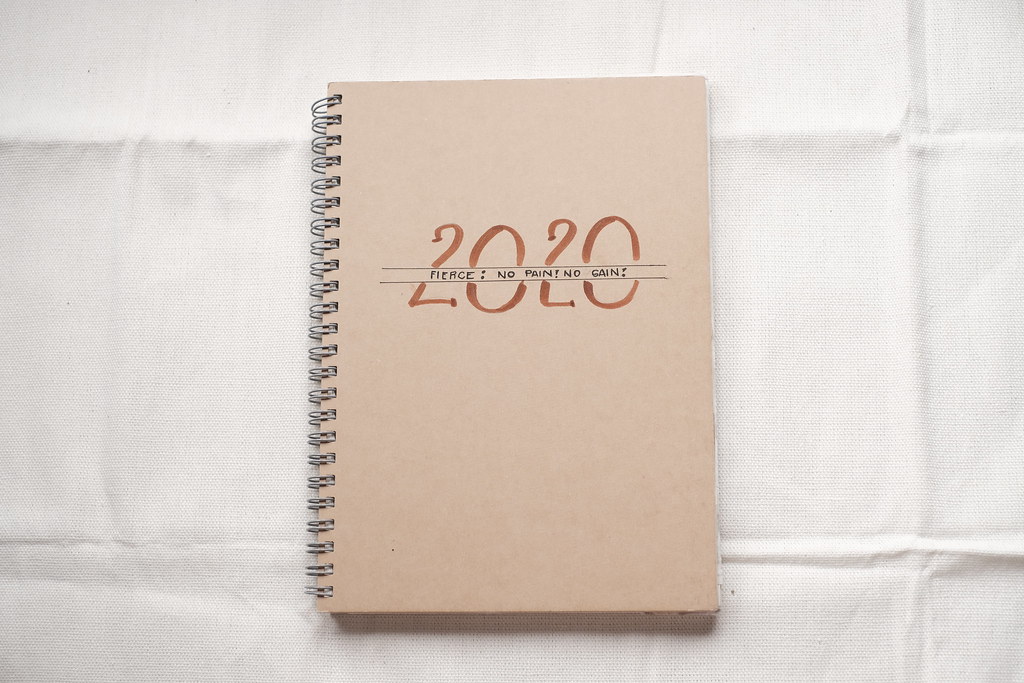
Well you have to know that this is not the actual color of the pages. I was using ambient light from the window when I took this photo. It was a cloudy day. The coffee designs here was stickers I bought from “The Craft Central”, Greenbelt Branch in Makati.

Verdict for this notebook: I am already using this notebook for more than a month and I would say I kind of regret choosing this. Don’t get me wrong it’s an amazing notebook. Not just for bullet journaling. I advised to stick with the popular choice: the dotted kind of notebook. I should have chosen Limelight brand. Or bought a dotted noteboook in Craft Central. But thankfully, Craft Central has this dotted paper pad. When I am tired and have no energy for straight lines, I paste a dotted paper into the notebook page. It also adds thickness to my pages. And yes, I have to tell that small dots in dotted pages will make your life easier in bullet journaling. So stick with that! In addition, choose a notebook with thick pages.
2. HUNTING FOR THE PEN and PENCIL. Another important thing I bought was the ballpen and pencil I would use. I also bought them at MUJI. I have no high standard with pencils so I bought what was available. It was the pen that I am quite picky about since the gel pen I have smears a lot and makes my writings messy. Thankfully, Muji has amazing retractable gel pen. I have put this pen in to smear tests before I bought it and I love the results. I have seen it featured in a lot bullet journalists IG’s too. Here’s how it looks like. It’s called “Smooth Gel Ink Ballpoint Pen Knock Type 0.5 Black”

This is how it looks like. It is called Smooth Gel Ink Ballpoint Knock Type 0.5
3. RULER: I bought two rulers. One is the ordinary transparent ruler. The other one was a wooden ruler that shaped like a giraffe. I bought the latter simply because it was cute. But I have to say I mostly use the transparent one the most.
4. CALLIGRAPHY PENS, WASHI TAPES, STICKERS, GLUE STICK. These are just optional. Before I went shopping for my supplies, I already knew the color scheme I want. I am leaning more these days to vintage feel of brown color. And for the first month I chose a coffee and pastry as a theme. So I bought stickers and washi tapes that aligns to my theme. I also bought a brown calligraphy pen.

This is where I bought my haul:
- Stickers: The Craft Central, Greenbelt Branch.
https://thecraftcentral.com/ - Washi Tapes: National Bookstore, Glorietta Branch
- Zig Fudebiyori Calligraphy Pen: National Bookstore, Glorietta Branch
- Glue stick:National Bookstore, Glorietta Branch
- Pens and Pencil: Muji, Greenbelt Branch
If you are not familiar, Greenbelt and Glorietta are two adjacent malls in Makati City, Philippines. Actually there are four neighbor malls in this area. Landmark, Greenbelt, Glorietta and SM Makati. They are even interconnected to each other by bridges so it was not hard to go from one to another. Landmark has amazing dotted notebooks and planners too. Not popular brands but they have adorable cute designs. It just so happens I want a clean slate, no design notebook. So if this area is accessible to you, I recommend for you to shop here but only in weekends. You’ll probably be traumatized to go here in weekdays. The traffic in Makati is terrible.
II. Bujo Set-up.
I get inspiration and format mostly from the bullet journalist I followed in Instagram. From super minimalist to colorful bujo. Mine was kind of in a middle. I am not good in drawing so I compensate it with cute stickers. I also pick the parts of bujo mostly from instagram. I was mesmerized by the different section that make-up their bujo so I pick those that I’ll find useful for me.
Section I: Just some general cover page stating my name and my theme.

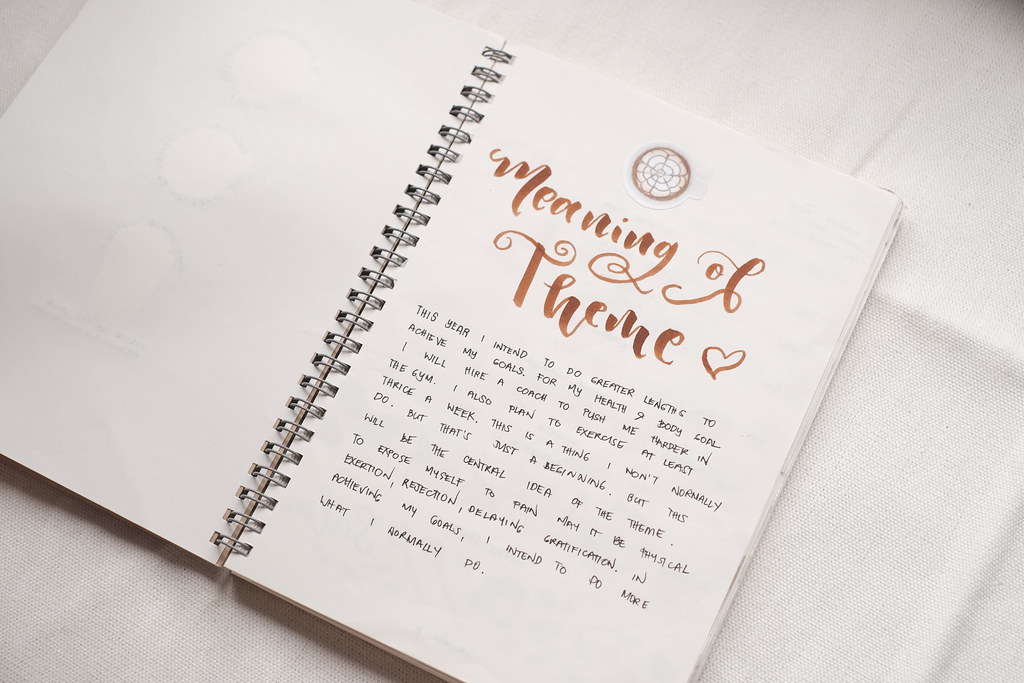
Section II: Meaning of the Theme of the Year
Section III and IV: Washi Tape Swatches and cover page of my lists. In this section I am planning to include my bucket list, movie list and other list related to my plans.

I am not yet done working on my list so I’ll skip those pages in this section for the meantime.
Section V: TRACKERS
One of my favorites. Trackers are like touchpoint monitoring of the goals you want to achieved. Here I created a tracker for my Workout Progress, word count for my novel and social media tracker. All are related to the goals I wanted to achieve this year.


A close up on my Weekly Exercise Result tracker.

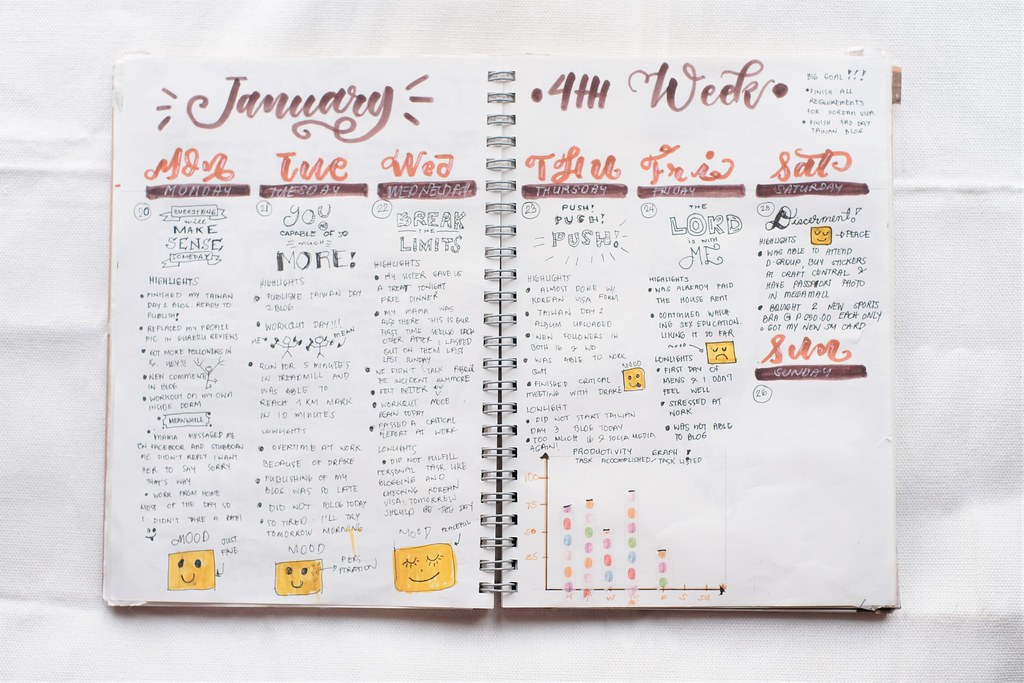
Section 6: Monthly Cover. Keeping it simple with the calendar and my goals for this month. Other monthly covers include future logs which could be birthdays, anticipated events and other scheduled activities.

Section 7: Habit Tracker. This month I wish to develop the following ten habits. Every habit has a badge and the goal is to at least earn at least 5 each day. This is one of the section that I feel very useful.

Section 8: Weekly Diary Spread. This is my most favorite because first of all, this is the reason why started bujo. I used to have a diary before but I am not chatty in paper these days. I am not as comfortable to blank pages unlike before. I just want to write down the highlights or things to be grateful for everyday. So a weekly spread diary is perfect for me. There is no pressure to write long paragraphs when I don’t usually have the mood to do so.
For the first week, my weekly spread has priority of the week checklist, productivity tracker and mood tracker.
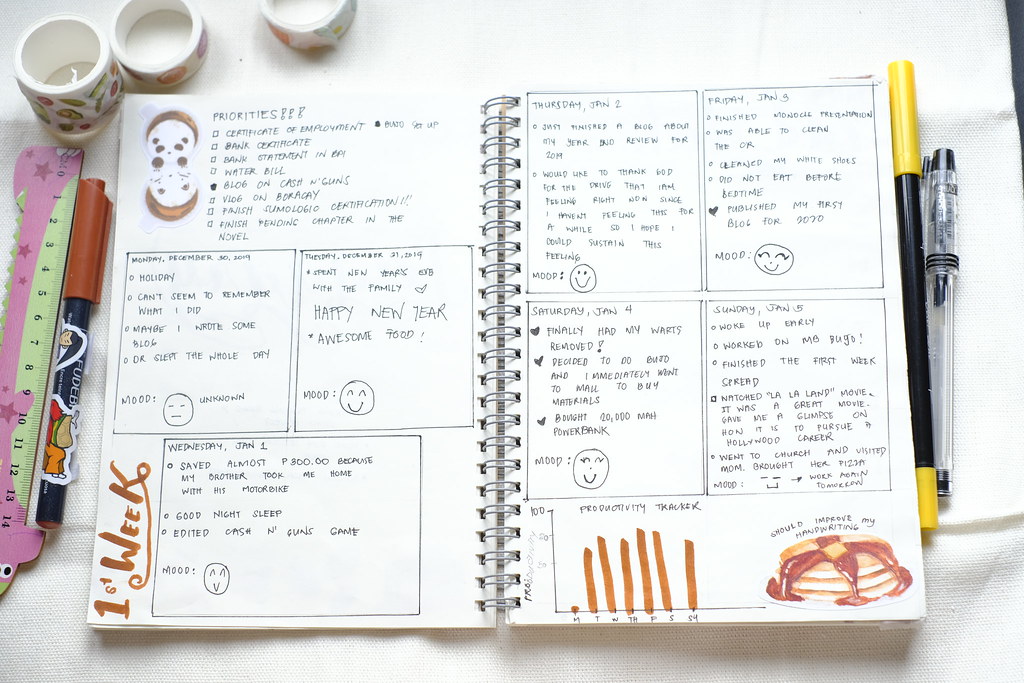
Some details.

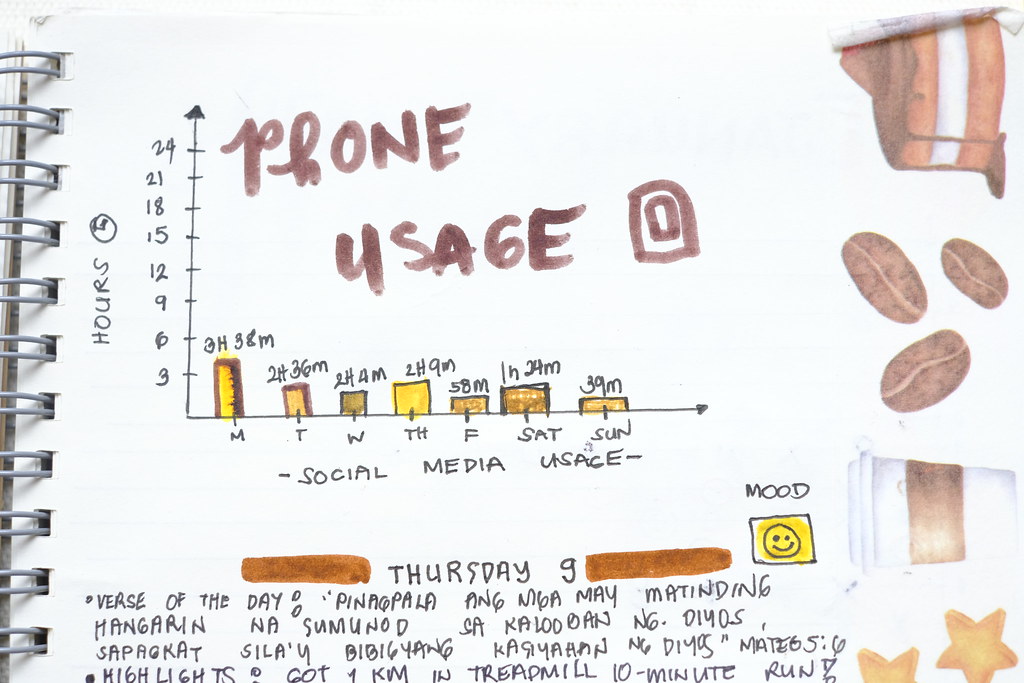
Second Week: This time I tried a horizontal lay-out. I am not fond of making straight lines so I let myself not to do it.
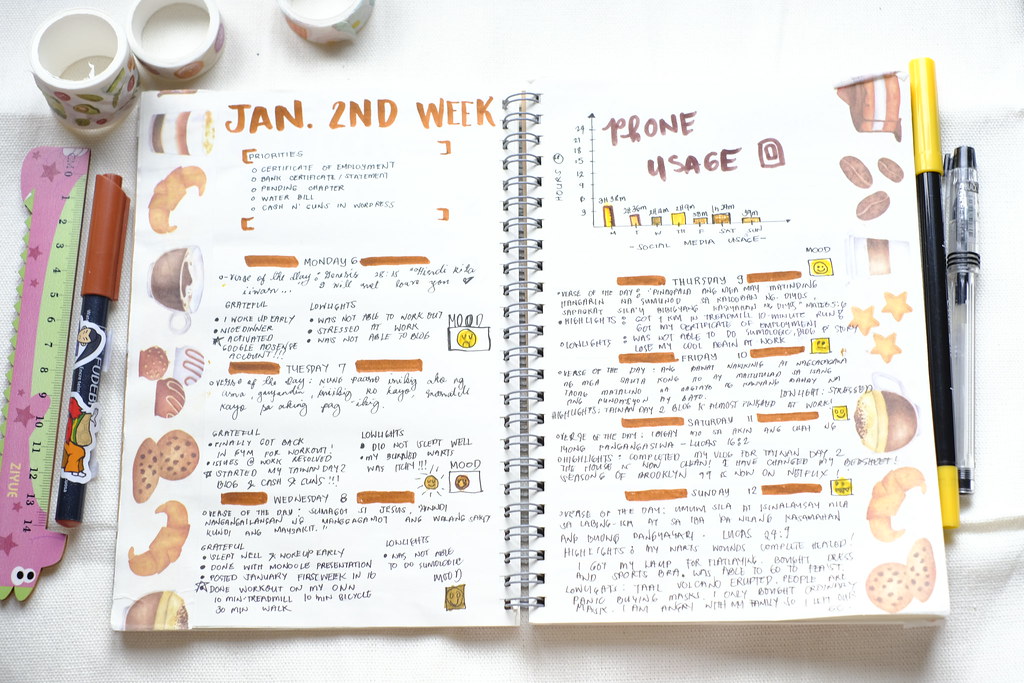
I added phone usage tracker. I was able to know my exact hours of usage by a free application I downloaded in Google Playstore. It’s name is YouHour. It’s an amazing app. I added this because I recognize my social media addiction specially Facebook. You could scroll for hours, endlessly and I felt like it really rots your brain.
Third Week: This time, it was still a horizontal layout. I went crazy with calligraphy but I like it. I love the stickers.


Fourth Week. This time I added a daily tiny calligraphy doodles. I still have a productivity tracker, mood tracker, and the list of my weekly goals. This time I tried the vertical layout.
You are capable of so much more!

Push! Push! Push!

Section 9: Payday Tracker!
I decided to do this so I could consciously divide my payday and track where it goes. I followed Truly Rich Club principles in dividing the salary.
50%. Monthly expenses and bills.
20% Savings and investments. This will go to savings account. Or buying stocks and other investments.
10% Tithe/ charity. Support your church or donate in a charity.
5% Emergency Fund. They say you must have at least 6 month-worth of salary to have a reliable emergency fund. This will serve as your fund just in case there are emergencies like work termination, accidents or calamities.
5% Enjoyment Fund. Fund for watching movies, eating-out with friends and family.
5% Educational Fund. Continue to grow by enrolling to a course that will help you improve or attain new skills.
5% Empower fund/ Luxury fund. This is the fund to buy gadgets or any luxuries.
I think this tracker would be a regular from now on. I really need it because I tend to forget my budget for particular area. By the way I haven’t seen this tracker to other bullet journalists so far. But I’m pretty sure others have their own versions of it.

Section 10: Month-End Evaluation. Wrapping this month with my accomplishments and areas to improve.

That’s it for my January Set-up. I am inviting you to watch a 1-minute flip-through of my coffee-themed January bujo. Please also subscribe as I will create more bujo related contents soon!
My Bujo is not actually the best out there but I hope this will inspire you to have your own bujo and make it as your tool to achieve your goals this year.
Before I end this blog I would also like to invite you to be my International Blogger Friend. The idea is to invite everyone in blogosphere and have at least one friend in each country so that means at least 195 blogger friends. It’s not limited to wordpress blogger, or to blogsite platforms. If you are a instagram blogger, facebook or youtuber, you are welcome! For more details, you can check out my About Page here.

I hope you accept my invitation and help me build my list 😉
Thank you in advance,
Remember, you are awesome and wonderfully made,
GUREZU
❤ ❤ ❤
For inquiries and collaborations, LET’s CONNECT!!!!!!
Facebook: https://web.facebook.com/Gurezu/
Instagram: instagram.com/gurezu
Youtube: Gurezu Reviews

You’re very artistic with your bujo, I wish mine could be as fancy but alas I do not have the flair 😂 I’ll just have to stick with my stamps and stickers!
LikeLike
A big Thanks to the inventors of stickers and washi. Hahaha! Thanks for checking out my blog.
LikeLike
Kainggit naman, lalo maganda ka magsulat at artistic 😁
LikeLike
Thank you! Kadalasan nasa mood yang pagmamamaganda ng sulat. Effort din hehe.
LikeLike
Very creative indeed. Sana marami din akong time. 🙂
LikeLiked by 1 person
Thank you Kuya! Grabe busy rin naman me. Naadik lang talaga me kaya naipipilit isingit sa time. Hehehehe.
LikeLike
aAaa kamiss mag BoJu! Dami ko sanang time kaso di nasipa ng kasipagan. LOL! HAHAHA Thank you for inspiring me to do it again. I’ll probably create a spread for March since it’s birthmonth. :))
LikeLike
Yeyeey please share it!
LikeLike
Your bujo looks neat! I used to try and keep a journal before, but it just wouldn’t stick. I always think it’s impressive when people have the dedication for it.
I’m a very digital and minimal person now so most of what you have on your bujo I keep track/do on my phone hahahahahaha.
LikeLike
It’s alright. It does not matter whether you have it digital or analog. If it’s functional and working for you, then you are doing great with your own way of bujo-ing. 😉
LikeLike
That is true! But bujo will always be so much prettier! 😆
LikeLike
Ang ganda ng gawa mo, Grace. Napaka creative.. 🙂
LikeLike
Thank u po Kuya Jeff!
LikeLike
Gurezu, your bujo looks amazing! It is cute & organized & your handwriting is amazing. Love the coffee theme & stickers so much! & I’m so wishing I would’ve had that 6 month emergency fund for the one we are in now. I actually never even heard that rule before!
LikeLike
Thanks Hunida for checking my blog! I hope you are still okay on your end. Everything happened in a flash and I think no one is super prepared for this.
LikeLiked by 1 person
I know. SO crazy! Hope you are okay as well ❤
LikeLike